# What is Linguana

Linguana is a platform for translating your website, designed from the ground up with SEO optimization and ease of use in mind.

Some of Linguana's advanced features include:

* **AI neural machine translations**: auto-translate your website
* **Subdirectory structure**: domain.com/de, domain.com/es etc.
* **Translated slugs**: domain.com/about -> domain.com/de/uber-uns
* **Metadata translations**: optimize for search engines
* **Image translations**: upload different images for each language
* **Hreflang tags**: get indexed on search engines in all languages
* **Auto-redirects**: automatically manage redirects between translated pages
* **Translation automation**: automatically detect, translate, and publish new content

<figure><img src="/files/R3pbYYDJYK1tRjMaaVIN" alt="Linguana translation features"><figcaption></figcaption></figure>


# How to get started

1. [Creating your account](#id-1.-creating-your-account)
2. [Creating a new project](#id-2.-creating-a-new-project)
   1. [Add project](#id-2.1-add-project)
   2. [Verify project](#id-2.2-verify-project)
3. [Syncing your website](#id-3.-syncing-your-website)
   1. [Add languages](#id-3.1-add-languages)
   2. [Sync pages](#id-3.2-sync-pages)
4. [Translating your website](#id-4.-translating-your-website)
5. [Publishing your website](#id-5.-publishing)
   1. [Add custom domain](#id-5.1-add-custom-domain)
   2. [Test and go live](#id-5.2-test-and-go-live)

### 1. Creating your account

To start using Linguana, you will need to create a new account at <https://app.linguana.io/sign-up>.

You can sign up with Google or by providing a valid email address and password.

### 2. Creating a new project

#### 2.1 Add project

<figure><img src="/files/qXoos7t6KlKQUtTariOL" alt="Create new Linguna project"><figcaption></figcaption></figure>

After signing up, you will automatically be prompted to add your first project.

When adding a new project, you will need to provide the following information:

* **Project name**: for your reference only (your website visitors will never see this)
* **Domain URL**: your website domain (this can be a staging subdomain like webflow\.io or framer.app, or your own custom domain)
* **Original language**: the language your website is currently written in

#### 2.2 Verify project

<figure><img src="/files/jxjnHHM7HfBdiMQZHrCi" alt="Add Linguana meta tag"><figcaption></figcaption></figure>

Once you've added your project, you will need to verify it. To do so, just add the provided meta tag to your website's `<head>` section. For example, for Webflow sites, this can be done in *Project Settings -> Custom Code*.

By default, you will be provided a staging address on Linguana where you can test your translations. This works just like webflow\.io and framer.app subdomains in Webflow and Framer.

### 3. Syncing your website

#### 3.1 Add languages

<figure><img src="/files/ySVHZ2VrFqiJP65uy5vn" alt="Add Linguana languages"><figcaption></figcaption></figure>

Now that your project is added and verified, it's time to add the languages that you'd like to translate your site to. Simply click *Add language* in the top right, enter all languages you would like to add, and submit by clicking *Add new languages* in the bottom right. Your project now has new language versions.

#### 3.2 Sync pages

This step is critical to ensuring you're able to translate your website. Once the new languages have been added, your site still needs to be synced. You'll notice each of the new languages has a *Load* button in place of the page count. You'll have to click this button for each language.

Additionally, you'll notice after you load the first language, website crawling will have automatically started. You can monitor the progress in the *Notifications* menu. You'll need to wait for this to finish to translate your website. This shouldn't take more than a few minutes (depending on the size of your website).

Keep in mind that if you made any edits to your website, you'll have to re-sync in Linguana for these changes to appear.

If you a sync a page (or all pages) for one language, those pages will also be synced in every other language.

### 4. Translating your website

<figure><img src="/files/iJOKtDsNty9uoh4owI3u" alt="Translate pages on Linguana"><figcaption></figcaption></figure>

Click on the language you wish to start translating, and on the next page you will see a list of all the pages on your website. Pages get imported automatically after crawling your sitemap.

If you do not have a sitemap (or if you have any hidden pages), you will need to manually add them by clicking *Import pages* in the top right, entering the page slug, and clicking *Add custom URL*.

Each page has a name (usually the page slug, except for the homepage and 404 page), status (*Published* or *Not published*), and an actions menu (where you can sync, translate, publish, unpublish, view, import, export, or delete the page).

To translate the text on your page:

* Click on page slug
* On the left, you'll see the existing source content (text and images)
* On the right, there are fields for translated content (text and images)
* Once you're done editing the field on the right (either manually or using AI translations), simply click out of the input field or move on to the next one. Linguana will auto-save your translated content.

### 5. Publishing

#### 5.1 Add custom domain

<figure><img src="/files/0fP7QCO6Z1ujCNZZTCY7" alt="Add custom domain on Linguana"><figcaption></figcaption></figure>

By default, you will be able to publish your project to a staging domain (i.e. yourproject.linguana.site). To add a custom domain, simply go to your project settings by expanding the menu right of the *Add language* button, and select *Settings*. There, open the *Custom domains* tab and add a new domain below.

Here, you can select if you would like to serve your domain with or without *www* (i.e. [www.domain.com](http://www.domain.com) or just domain.com). This generally does not impact SEO, so it is just a matter of preference.

Next, you will need to set up DNS records. To do so, please follow the steps:

1. Remove existing DNS records
2. Add DNS records provided to you in Linguana
3. Remove your custom domain from your website
4. Add linguana subdomain to your website (i.e. linguana.yourdomain.com)
5. Publish your website to linguana subdomain

After that is completed and DNS records are propagated, your site should be live.

#### 5.2 Test and go live

After you translate a page, we suggest you first publish it to the staging *linguana.site* subdomain.

After confirming everything is in order, click *Publish* and select the main domain as well. This will publish your translations.

*Keep in mind that changes to your site always need to be  synced, translated, and published manually.*


# How to publish translations

1. [Sync your project with your website](#sync-your-project)
2. [Confirm all text is translated](#translate-all-text)
3. [Publish all website URLs](#publish-all-website-urls)

### Sync your project

The first step to translating your project is to ensure Linguana has synced the latest version of your website. We can do this by instructing Linguana to crawl all of your website's pages. You can do this is by clicking the *Sync links* button, followed by the *Sync content* button on your project page.

<figure><img src="/files/9wDt7bJSTH7STxI2cy9B" alt=""><figcaption></figcaption></figure>

Then, wait a few minutes for website crawling to complete. You can monitor the progress in the *Notifications* menu.

### Translate all text

Next, you need to make sure all website text is translated. The easiest way to do this is to click the green *AI translate* button next to the sync button.

<figure><img src="/files/Wox5KAX0jqElMAz7rjzc" alt="Generate AI translations for Linguana"><figcaption></figcaption></figure>

If you don't want to use the AI translation feature, you can navigate into each language and each page individually. However, be completely certain to translate all text. Anything left untranslated will display in the original language.

### Publish all website URLs

Finally, make sure to publish all URLs of your website. You can do this by clicking the white *Publish* button at the top of your main project page.

<figure><img src="/files/rKWTPcrAH9EE6Kag2Fou" alt="Publish Linguana translations"><figcaption></figcaption></figure>

That button will automatically publish your entire website. Or, you can navigate through each language and page to publish individually. Just remember to not leave any page unpublished. *The old version of your website will be visible for any unpublished languages.*


# FAQs

Frequently Asked Questions

<details>

<summary>What is Linguana?</summary>

Linguana is a Webflow and Framer website translation tool that allows you to translate and localize your website into multiple languages.

</details>

<details>

<summary>How does Linguana work?</summary>

Linguana works by parsing your website content, caching it, and then serving translated static pages.

Because we parse the entire website HTML, you can also translate hidden content, such as meta tags, Open Graph data, page titles, media files, and alt tags.

</details>

<details>

<summary>Is Linguana only for multilingual Webflow or Framer sites?</summary>

In addition to Webflow and Framer, Linguana supports Carrd, Wix, and WordPress - with more coming soon.

</details>

<details>

<summary>How is Linguana different from Weglot?</summary>

Next to being a lot more affordable, it is easier to use and does not force AI translations in its pricing (manual translations are completely free). Linguana is also optimized for Webflow and Framer, offering features such as subdirectory structure, additional top-level domains, and translated slugs even in the most affordable package.

</details>

<details>

<summary>How is Linguana different from Polyflow?</summary>

Linguana and Polyflow are both web translation tools specialized in supporting multilingual Webflow sites.

</details>

<details>

<summary>Which languages are supported?</summary>

Linguana supports 109 languages, all of which can also be translated using our AI auto-translations.

We support Afrikaans, Albanian, Amharic, Arabic, Armenian, Azerbaijani, Basque, Belarusian, Bengali, Bosnian, Bulgarian, Catalan, Cebuano, Chinese, Chinese, Corsican, Croatian, Czech, Danish, Dutch, English, Esperanto, Estonian, Finnish, French, Frisian, Galician, Georgian, German, Greek, Gujarati, Haitian Creole, Hausa, Hawaiian, Hebrew, Hindi, Hmong, Hungarian, Icelandic, Igbo, Indonesian, Irish, Italian, Japanese, Javanese, Kannada, Kazakh, Khmer, Kinyarwanda, Korean, Kurdish, Kyrgyz, Lao, Latin, Latvian, Lithuanian, Luxembourgish, Macedonian, Malagasy, Malay, Malayalam, Maltese, Maori, Marathi, Mongolian, Myanmar (Burmese), Nepali, Norwegian, Nyanja (Chichewa), Odia (Oriya), Pashto, Persian, Polish, Portuguese (Portugal, Brazil), Punjabi, Romanian, Russian, Samoan, Scots Gaelic, Serbian, Sesotho, Shona, Sindhi, Sinhala (Sinhalese), Slovak, Slovenian, Somali, Spanish, Sundanese, Swahili, Swedish, Tagalog (Filipino), Tajik, Tamil, Tatar, Telugu, Thai, Turkish, Turkmen, Ukrainian, Urdu, Uyghur, Uzbek, Vietnamese, Welsh, Xhosa, Yiddish, Yoruba and Zulu.

</details>

<details>

<summary>How accurate are Linguana AI translations?</summary>

We're using Google Cloud translations in collaboration with our own in-house algorithms to provide market-leading translations to save you money and time.

</details>

<details>

<summary>Is Linguana good for SEO?</summary>

Yes! In fact, Linguana was designed from the ground up with SEO optimization in mind. SEO experts were closely involved in the development process to ensure the best possible search engine performance in all languages.

Some examples of SEO optimization include subdirectory structure (or completely custom URLs), translated URL slugs, meta titles, meta descriptions, alt tags, image titles, meta language tags, and much more.

</details>

<details>

<summary>How can I edit AI translations?</summary>

All translations are editable, even AI ones. You can simply edit them in the project view of your dashboard, basically the same way you added them.

</details>


# Create a new project

When creating a new project, first you will need to enter the project name, URL (you can use the webflow\.io or framer.app subdomain, and add your custom domain later), and the original language used in your website.

<figure><img src="/files/qXoos7t6KlKQUtTariOL" alt="Create new Linguana project"><figcaption></figcaption></figure>

In the next step, in order for Linguana to parse your site, you will need to verify it. To do so, simply add the provided meta tag in the `<head>` section of your website.

***How to add meta tag for Webflow***

1. `Visit the 'Settings' > 'Custom code' tab`
2. `Paste the meta tag in the 'Head code' section`
3. `Click 'Save', then 'Publish'`

[Refer to Webflow documentation for more detail.](https://university.webflow.com/lesson/custom-code-in-the-head-and-body-tags?topics=site-settings#custom-code-in-site-settings)

***How to add meta tag for Framer***

1. `Visit the 'Site Settings' > 'General' tab and scroll down to the 'Custom Code' section`
2. `Paste the meta tag in the 'End of <head> tag' section`
3. `Click 'Save', then 'Publish'`

[Refer to Framer documentation for more detail.](https://www.framer.com/academy/lessons/custom-code)

***How to add meta tag for Carrd***

1. `Open your project, click '+ Add Element', and select '</> Embed'`
2. `Set the 'Style' to 'Hidden' and paste the meta tag in the 'Code' section`
3. `Click 'Done' and publish your site`

[Refer to Carrd documentation for more detail.](https://carrd.co/docs/building/embedding-custom-code)

***How to add meta tag for Wix***

1. `Go to 'Settings' in your site's dashboard and click on 'Custom Code' in the 'Advanced' section`
2. `Click '+ Add Custom Code' at the top right and paste the meta tag`
3. `Select 'Load code on each new page' and click 'Apply'`

[Refer to Wix documentation for more detail.](https://support.wix.com/en/article/embedding-custom-code-on-your-site)

<figure><img src="/files/jxjnHHM7HfBdiMQZHrCi" alt="Verify Linguana project"><figcaption></figcaption></figure>


# Adding new languages

Once your have selected your original language and your project has been created, you can add new language variations.

There is no limit in how many languages you can translate your website, and adding new languages is very easy.

<figure><img src="/files/ySVHZ2VrFqiJP65uy5vn" alt="Add languages to Linguana project"><figcaption></figcaption></figure>


# Remove language

Languages can easily be deleted using the option from the action menu.

<figure><img src="/files/RILpV4GHYhWYeyKCQJsS" alt="Deleting Linguana languages"><figcaption></figcaption></figure>


# Translate manually

If you wish to manually translate your pages, simply fill out the translation fields individually.

Manual translations in Linguana are free and **do not** require you to purchase AI credits.

<figure><img src="/files/kDQEL7TqP7rUaNKgXhIb" alt="Enter manual translations on Linguana"><figcaption></figcaption></figure>


# Translate using AI

Our AI uses Google Cloud Translations to translate your content. Translating with AI requires AI credits. You can view your balance in the top right corner of the website, in the navigation bar.

1 AI credit equals 1 translated word. Translations are seamless and extremely fast.

<figure><img src="/files/PM9mX4lWVeJHKnQiB1dc" alt="Neural machine translations on Linguana"><figcaption></figcaption></figure>


# Translate instances of identical elements

This functionality addresses the challenge of translating multiple instances of identical attributes on a page, such as using the same image in different places.&#x20;

A common scenario where this issue manifested was when users attempted to set an `og:image` attribute for a blog page's featured image and then reused that same image elsewhere in the template. In such cases, Linguana's parser was designed to only translate the source for the first instance it encountered—typically the meta tag for the `og:image`—leaving subsequent instances of the same image untranslatable.

This behavior limited the flexibility needed for comprehensive site translations, especially for users looking to maintain consistent translated content across their web pages.

**Solution: data-linguana-force attribute**

To overcome this limitation, the data-linguana-force attribute can be used. By applying this attribute to any image element, users can explicitly instruct Linguana's parser to consider that element for translation, effectively overriding the previous one-instance limitation.

**How to use: data-linguana-force attribute**

To leverage this enhancement:

1. Add the data-linguana-force attribute to the image element you wish to translate, even if it has been used previously on the same page.

<figure><img src="/files/NYkEWlHwNa9lbdoPxoaH" alt="" width="235"><figcaption><p>On Webflow, add attributes in the <em>Settings</em> menu for any element</p></figcaption></figure>

1. Trigger *Sync content* for all pages where this change has been made.
2. Enter translations for all elements with this attribute in each page menu.

*Note: this feature can be used on any element type.*&#x20;


# Redirections

Redirections are used to automatically navigate visitors away from one page and to another. This can be used to prevent visitors from viewing incomplete/untranslated pages or ensure visitors don't view a URL that has been changed.

### How to add a redirection

To add a redirection, first navigate to the *Settings* menu for your project. Then, click on *Redirections*. Use the menu to enter the old path, new path, and whether this is a permanent or temporary redirection. Then, click *Add redirection*.


# Language switchers

### How to add language switcher

To add a language switcher, first navigate to the *Settings* menu for your project. Then, click on *Language switcher*. Use the menus to customize the language switcher to your liking. Make sure to check off "Auto-select language based on visitor's browser settings" if you want language auto-selection. Then, click *Copy code snippet* in the bottom right. Now, you'll embed the code on your website.

**Please note:** the language switcher will not appear until you've published multiple translations from the Linguana dashboard.

**How to embed the language switcher for Webflow:**

1. Visit the 'Settings' > 'Custom code' tab.
2. Paste the lanuage switcher code snippet in the 'Footer code' section.
3. Click 'Save', then 'Publish'.

Refer to the [Webflow documentation](https://university.webflow.com/lesson/custom-code-in-the-head-and-body-tags?topics=site-settings#custom-code-in-site-settings) for more details.

**How to embed the language switcher for Framer:**

1. Visit the 'Site Settings' > 'General' tab.
2. Scroll down to the 'Custom Code' section.
3. Paste the lanuage switcher code snippet in the 'End of \<head> tag' section.
4. Click 'Save', then 'Publish'.

Refer to the [Framer documentation](https://www.framer.com/academy/lessons/custom-code) for more details.

**How to embed the language switcher for Carrd:**

1. Open your project, click '+ Add Element'.
2. Select 'Embed'.
3. Set the 'Style' to 'Hidden' and paste the language switcher code snippet in the 'Code' section.
4. Click 'Done' and publish your site.

Refer to the [Carrd documentation](https://carrd.co/docs/building/embedding-custom-code) for more details.

**How to embed the language switcher for Wix:**

1. Go to 'Settings' in your site's dashboard.
2. Click on 'Custom Code' in the 'Advanced' section.
3. Click '+ Add Custom Code' at the top right.
4. Paste the language switcher code snippet.
5. Select 'Load code on each new page' and click 'Apply'.

Refer to the [Wix documentation](https://support.wix.com/en/article/embedding-custom-code-on-your-site) for more details.

Finally, go back to Linguana, and click *Sync content*, then *Publish*. Now your language switcher should be live on your site.

### Basic language switcher code

```
<script>
var LINGUANA_MAIN_LANGUAGE_CODE = "en";
var LINGUANA_AUTO_DETECT_LANGUAGE = true;
</script>
<script src="https://static.linguana.io/public/linguana_switcher.min.js"></script>
<link
  type="text/css"
  rel="stylesheet"
  href="https://static.linguana.io/public/linguana_switcher.min.css"
/>
```

### **Language switcher customization options**

1. **LINGUANA\_MAIN\_LANGUAGE\_CODE**: This represents the original language that your website was written in, such as "fr" for French, "de" for German, or "en" for English. By default, it is set to "en".
2. **LINGUANA\_DEFAULT\_LANGUAGE\_CODE**: This represents the default language that you would like the website to display to new visitors, such as "fr" for French, "de" for German, or "en" for English.
3. **LINGUANA\_AUTO\_DETECT\_LANGUAGE**: Set this to true to automatically detect and select the visitor's language based on their browser settings. If their preferred language is not available, the main language will be selected. This will have preference over the default language setting.
4. **LINGUANA\_SWITCH\_CUSTOM\_CONTAINER\_ID**: This is used for completely customizing the language switcher. Add this variable and create an element wrapper with the specified ID. The script will then render the switcher in that location. If you use this, it is advisable to avoid using Linguana's CSS and create your own custom CSS instead.
5. **LINGUANA\_SWITCH\_TOGGLE\_BUTTON\_ID**: This specifies the ID of the toggle button. If you change this ID, you will need to provide your own CSS for styling the button.
6. **LINGUANA\_OPTIONS\_CONTAINER\_ID**: This defines the ID of the wrapper div that contains the language link options.
7. **LINGUANA\_SINGLE\_OPTION\_CLASS**: This specifies the class for a single option container within the language switcher.
8. **LINGUANA\_SINGLE\_OPTION\_FLAG\_CONTAINER\_CLASS**: This represents the class of the element that contains the flag icon for each language option.
9. **LINGUANA\_SINGLE\_OPTION\_LABEL\_CONTAINER\_CLASS**: This specifies the class of the element that contains the label for each language option, such as "en" for English.
10. **LINGUANA\_SHOW\_LANGUAGE\_CODE**: Set this to true if you want to display the language code (e.g., "EN") on the label. If disabled, the label will not show the language code.
11. **LINGUANA\_SHOW\_LANGUAGE\_NAME**: Enable this to display the language name (e.g., "English"). If both this and LINGUANA\_SHOW\_LANGUAGE\_CODE are enabled, the label will show the language in the format: "English (EN)".

### **Styling the language switcher**

You can style the language switcher by simply using CSS in your global footer code.


# Custom domains

To add a custom domain, you will first need to be subscribed to one of the Linguana paid plans. At that point, you can go to your project settings (click on your project from the home screen and then click *Settings* in the top right) and then click on the *Custom domains* tab.

**How to add a custom domain on Linguana**

1. **Test your translations on the Linguana staging domain** to ensure that everything is working correctly.
2. **Remove your website from 'your-domain-here.com' and publish it to 'linguana.your-domain-here.com'.** This is necessary because your root domain will now be hosted on Linguana instead of your original platform. [De-index the 'linguana.your-domain-here.com' subdomain](/translating-your-website/block-indexing-for-linguana-subdomain) if you don't want it to appear in search engine results.
   1. [Webflow subdomain instructions](https://university.webflow.com/lesson/connect-a-subdomain?topics=hosting-code-export#how-to-add-a-custom-subdomain)
   2. [Framer subdomain instructions](https://www.framer.com/help/articles/how-to-connect-a-custom-domain/#configure-a-subdomain)
   3. [Carrd subdomain instructions](https://carrd.co/docs/sites/using-a-custom-subdomain)
   4. [Wix subdomain instructions](https://support.wix.com/en/article/connecting-a-subdomain-to-a-site-in-your-wix-account)
   5. [WordPress subdomain instructions](https://wordpress.com/support/domains/connect-subdomain/)
3. **Copy the DNS records provided on Linguana** and add them to your domain's DNS settings.
   1. [Namecheap DNS instructions](https://www.namecheap.com/support/knowledgebase/article.aspx/319/2237/how-can-i-set-up-an-a-address-record-for-my-domain/)
   2. [Squarespace DNS instructions](https://support.squarespace.com/hc/en-us/articles/360002101888-Adding-custom-DNS-records-to-your-Squarespace-managed-domain)
   3. [Dynadot DNS instructions](https://www.dynadot.com/community/help/question/create-A-record)
   4. [GoDaddy DNS instructions](https://www.godaddy.com/help/add-an-a-record-19238)
   5. [Other DNS instructions](https://university.webflow.com/integrations-type/domains)
4. **Remove any conflicting records.** If you're using a CDN, disable proxying for all records.
5. **Click the 'Verify' button below** after the DNS records have propogated. It can take 30 minutes or more.
6. **Remember to publish all pages** of your project on Linguana to your new domain to make your website live.


# Automations

If you don't like having to manually sync, translate, and publish your website on [https://app.linguana.io](https://app.linguana.io/) every time you make a change, you can configure Linguana to do this automatically for you every day.

To set up this automation, go to [https://app.linguana.io](https://app.linguana.io/), select your project, and click *Settings*. Then, click *Automations*. On that page, you can enable either *Automatic daily sync and publish* and/or *Automatic daily translation*.

<figure><img src="/files/wXaSBcbs8pnVyvubBqUY" alt=""><figcaption><p>Automations menu</p></figcaption></figure>

If both options are enabled, every day between 4AM and 7AM UTC, Linguana will automatically sync with your website, translate all content, and publish to any custom domains. All content anywhere on your website not already translated will be automatically translated using any AI credits you have available. If you've run out of AI credits, the translation will not run, and Linguana will send you an email asking you to refill your AI credits. Your project will be published to all custom domains that are verified.


# Fix outdated live website

If you've updated your website, but the new changes aren't displaying when you visit your domain, this may be because the Linguana cache is storing old content. You can easily fix this from your project page.

Simply navigate to [https://app.linguana.io](https://app.linguana.io/), select your project, and click the *Clear cache* button.

<figure><img src="/files/DOnvP7wGyF23Rlwfyews" alt=""><figcaption></figcaption></figure>

It make take some time for the process to complete. You can view status updates in the *Notifications* menu.

**Please note:** the *Clear cache* button will only be visible once you have [added a custom domain](/translating-your-website/custom-domains). **Content served from staging domains is never cached.**

## Disable caching

If you want to permanently disable caching for all pages on your website, add the following meta tag to your website's header code:

```
<meta name="linguana-no-cache" content="true"/>
```

Once you've added the meta tag, you will need to sync and publish your website pages for the cache disable to take effect.

**Please note:** Disabling caching will reduce your website's performance.

If clearing your website's cache doesn't fix your issue, it may be because you haven't translated the new changes into your languages yet. Follow the [translation process instructions](/getting-started/how-to-publish-translations) to fix this.


# Fix untranslated text

In some rare cases, Linguana may fail to detect some text that should have been translated. If you notice text on your website that isn't translated, and also isn't listed for that page on Linguana, there are steps you can take to fix the issue.

The most common cause for untranslated text is mismatched HTML formatting. **If the HTML of the translation does not match the HTML of the original text, Linguana may not be able to match up the translation with the original.**

To fix this, on Linguana, navigate to the page where there is untranslated text, location the translation, and select the `<>` buttons to view the HTML for the original and the translation.

<figure><img src="/files/9UQs54mDUjWXaGNnOzdF" alt=""><figcaption><p>View raw HTML</p></figcaption></figure>

Next, review the HTML to ensure the original and the translation match exactly. In this example, there needs to be two `<br>` elements in the middle of the text.

<figure><img src="/files/9pded40BswoiB231nMsQ" alt=""><figcaption><p>Ensure line break elements match</p></figcaption></figure>

In this next example, a hyperlink element is required at the very beginning of the translation. The positioning of the HTML element also needs to match exactly. There cannot be any text placed before this hyperlink element.

<figure><img src="/files/9DNe5rJQ5AUyp2aK0k5r" alt=""><figcaption><p>Ensure hyperlink elements match</p></figcaption></figure>

Once you've confirmed the translation HTML matches the original, you can click *Publish* to view your website live and confirm your issue has been resolved.

## Custom translations

**If your issue is still not resolved, you can also try to create a custom translation to fix the issue.**

<figure><img src="/files/NxjPk6p0Pxv3S9LhpCEw" alt=""><figcaption><p>Add custom translation</p></figcaption></figure>

1. Navigate to the page translations where the missing translation is located, and click the *Add custom translation* button.

<figure><img src="/files/717sB4hBn79ObRNUt3hj" alt=""><figcaption><p>Enter custom translation text</p></figcaption></figure>

2. Fill in the custom translation that appears with the text to be translated under *Original* and the translation under *Translation*. **IMPORTANT: Add a separate custom translation for each part of your content. For example, add a new custom translation after every line break or transition to/from bold, italic, or underlined text.**
3. Click *Publish*, and that's it!


# Add translated links

Linguana offers the ability for you to display a different version of any URL on your website for each translation. This can be achieved using the **data-linguana-translated-link** attribute.

1. Add the **data-linguana-translated-link** attribute to any element that is to be parsed and translated.

<figure><img src="/files/vDDFNvQ1xLPKcdZCrcLQ" alt="" width="236"><figcaption><p>On Webflow, add attributes in the <em>Settings</em> menu for any element</p></figcaption></figure>

2. Trigger *Sync content* for any pages with links that are to be translated.
3. Paste in the translated version for each link, and publish your website.


# Block indexing for Linguana subdomain

Please follow the instructions below to de-index the Linguana subdomain (*linguana.your-website.com*), and only index the main domain (*your-website.com*).

**1. robots.txt**

Add the following text to your website's **robots.txt**, save the changes, and publish.

*`User-agent: *`*

*`Disallow: /`*

Linguana will replace `Disallow` to `Allow` in the proxy, so the main domain will still get proxied.

**2. Meta tag**

Add the following meta tag to the `<head>` section in the global custom code of your website.

`<meta name="robots" content="noindex, nofollow">`

Linguana will automatically delete this line on the main domain, so only the Linguana subdomain will be de-indexed.


# Hide content

Linguana offers the ability for you to indicate when a specific element on your website should be hidden on all translated pages. This can be achieved using the **data-linguana-ignore** attribute.

1. Add the **data-linguana-ignore** attribute to any element that is to be hidden.

<div align="center" data-full-width="false"><figure><img src="/files/d7Mgu5IWN0oiJuGVqKPb" alt="linguana-ignore class" width="237"><figcaption><p>On Webflow, add attributes in the <em>Settings</em> menu for any element</p></figcaption></figure></div>

2. Trigger *Sync content* and *Publish* for any pages with elements that are to be excluded.


# Skip translation for content

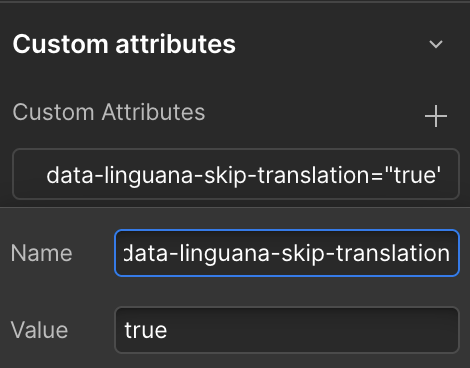
You can tell Linguana when you want to never translate a specific element. This can be achieved using the **data-linguana-skip-translation** attribute.

1. Add the **data-linguana-skip-translation** attribute to any element that is to be *not* translated.

<div align="center" data-full-width="false"><figure><img src="/files/8TJVo5vbVKJNOkZXpKdD" alt="linguana-skip-translation class" width="235"><figcaption><p>On Webflow, add attributes in the <em>Settings</em> menu for any element</p></figcaption></figure></div>

2. Trigger *Sync content* and *Publish* for any pages with elements that are to be skipped.


# Import or export translations

## Import translations

To import translations, first make sure that you have your translations in CSV format. Most translation providers offer a way to export your translations as a CSV file.

For Weglot migrations, refer to the following link for instructions on how to export your translations: <https://www.weglot.com/academy/import-export-translations>

Next, you need to make sure your CSV file is correctly formatted. These are the columns expected by Linguana:

**text | ai\_translation | manual\_translation | text\_type | attribute\_name | parsed\_element\_type**

*All values should be separated by the vertical bar character (|). It is acceptable to leave values blank.*

For Weglot migrations, you can use the following Python script to automatically convert your translations into the correct format:

{% file src="/files/S5F9E9WEXF0RTMoogGsB" %}
Automatically convert exported Weglot translation to Linguana formatting
{% endfile %}

To use the Weglot conversion Python script, simply right-click and save the above file, and run the following command in your terminal in the directory the file was saved.

*Make sure to change the input file path to the path of your Weglot translations CSV and the output file path to the path you want to save your Linguana translations CSV.*

```
python convert_from_weglot_to_linguana.py /path/to/input/folder/en_es.csv /path/to/output/folder/en_es_linguana.csv
```

Once you have a correctly formatted CSV file, go to the Linguana dashboard, navigate to the page or language you'd like to import translations for, click the three vertical dots in the top right, select "Import CSV", and upload your translations file.

## Export translations

To export existing translations, simply navigate to the page or language you'd like to export, click the three vertical dots in the top right, and select "Export CSV". That's it!


# AI credits

AI credits are used for translating your website content with AI. **They are not required to use Linguana.** Subscriptions come with a limited amount of AI credits that do not renew, but additional AI credits can be purchased.

*1 AI credit equals 1 translated word.* This means that if your website has 100,000 words, it will cost you 100,000 credits to AI translate. If you opted for the Business plan, you would have already received 100,000 credits on your account upon sign up.

**AI credits are not a subscription item, and will not add to your monthly cost**. They are a pay-as-you-go, one-time purchase, and can be purchased as needed.

**If you will be translating the website manually** and not be using AI translations, **you can do so without purchasing AI credits.**

You can buy AI credits on <https://app.linguana.io/credits> or by clicking on your credits balance in the navigation bar.


# Purchasing AI credits

You can purchase AI credits by visiting <https://app.linguana.io/credits>, or by clicking on your balance in the navigation bar and selecting the package you wish to go for. Higher priced packages have a lower price per-credit.

<figure><img src="/files/AdpVMy7aEzR9Qk8TT0j0" alt="Purchasing AI credits on Linguana"><figcaption></figcaption></figure>


# Account settings

You can change your profile picture, name and email in your account settings by clicking on your profile picture in the navbar, and then selecting *Account* in the dropdown menu.

If you are signed in, you can also reach account settings via this link: <https://app.linguana.io/settings?active=0>

<figure><img src="/files/n28jnbqE1LwO0cWuKU6j" alt="Configuring Linguana account settings"><figcaption></figcaption></figure>


# Change password

You can change your password by clicking on your profile picture in the navbar, and then selecting *Change password* in the dropdown menu.

If you are signed in, you can also reach account settings via this link: <https://app.linguana.io/settings?active=1>

<figure><img src="/files/04MWxWNWeEly1eAFc5ji" alt="Changing Linguana password"><figcaption></figcaption></figure>


# Notification settings

You can change your notification settings by clicking on your profile picture in the navbar, and then selecting *Notifications* in the dropdown menu.

If you are signed in, you can also reach account settings via this link: <https://app.linguana.io/settings?active=2>

<figure><img src="/files/9VXApdO73KFm0pDI90a1" alt="Changing Linguana notifications settings"><figcaption></figcaption></figure>


# Billing settings

You can change your notification settings by clicking on your profile picture in the navbar, and then selecting *Billing* in the dropdown menu.

If you are signed in, you can also reach account settings via this link: <https://app.linguana.io/settings?active=3>

<figure><img src="/files/fNl3YTW2xQ9n1sEGqldC" alt="Changing Linguana billing settings"><figcaption></figcaption></figure>


# Delete your account

You can delete by clicking on your profile picture in the navbar, and then selecting *Account* in the dropdown menu, and navigating to *Delete account*.

If you are signed in, you can also delete your account via this link: <https://app.linguana.io/settings?active=4>

<figure><img src="/files/JDoCnUbnhiBBbm8cXKZq" alt="Deleting Linguana account"><figcaption></figcaption></figure>